clock in progress

I am working on the ancient clock which will be on the ground over a rocky surface. Mr puppet will walk around this clock. There are stairs which he will use to walk over the clock. There will be a mosaic of ancient greek zodiac on the outher edge, outside.

This is the original clock. This is a second-hand clock I bhought. I am using its clock mechanism.
Referance images for stone texture, zodiac symbols, clock design.
Got a foam sheet and cut the clock shape and stairs. Added details of the each stone block at the end.
Glued all round the clock with foam glue. (Make sure to not to loose details of the bocks)
Glued all round the clock with foam glue. (Make sure to not to loose details of the blocks)

You see pieces of stones on the right bottom. Those are the broken stones which will be placed around the clock after it is done. This is a fun way to let those dry and later paint without touching anything. I have left all to dry. Tomorrow I will start painting. A lot of fun 🙂.

Ok, it is time for chronos

Yes, it is time to start working on the clock which will be placed inside rocky surface. This time I may start posting the process here before it is all completed. Lets see.. There is a long way to go baby….

hey I have a tree sitting on my table…

It needs more work but not now.. Later when I have the rocks ready. And even more work when the background painting is ready..

glue leaves onto the tree

When it was time to actually glue the leaves onto the tree, I was totally suprised. You know I made a test. I was able to stick the leave onto my test branch easily with super glue. But when I tried sticking to the branch, because of the many layers of acrylic paint , super glue did not work… I spent one day to just figure out how to solve this problem. Eventually, I melted the tip of the stalk with a candle light, pressed onto the tree where I want to stick to change the shape of the tip when it was hot. Because it is plastic it takes the shape of the surface easily when it is hot. Then dropped couple of super glue and sticked over the tree. Oh my poor hands, poor fingers…

.

leavesssssss, many leaves… crazy

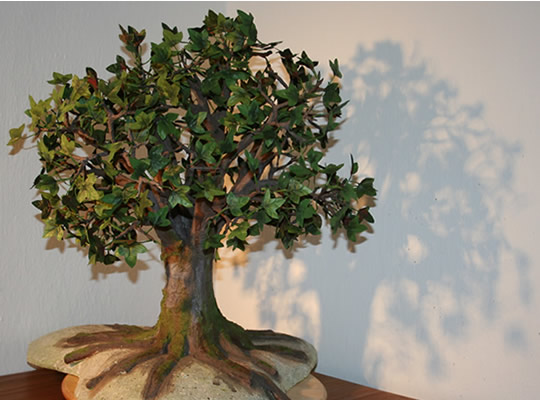
I created 500 leaves by cutting, gluing, painting back and fronts… It was crazy. And after all this process leaves look kind of big on the tree and I am not totally happy with the result. I wanted leaves to be big but I could have done little smaller. Anyways, maybe I would work more on the leaves and cut later.. who knows. Here is the process:

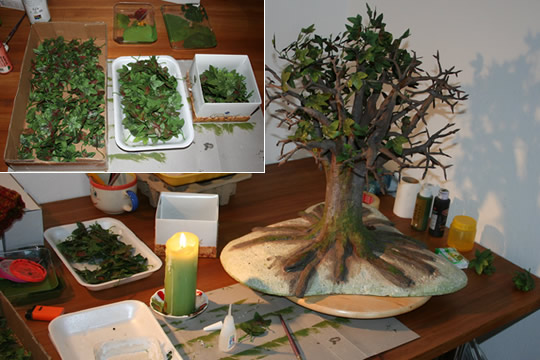
I bought some plastic leaves from a craft store. Cut one of those, paint and made a test shot over the tree to make sure the size and paint. After that, I cut 500 leaves into 3 different sizes. You know there are different sizes of leaves on a tree. Thanks to my friend Ozgul who helped me cutting the leaves… The leaves I bought from the store were really cheap and coarse. So, I needed to glue back and front sides with the wood glue before painting to have strong edges after cutting.

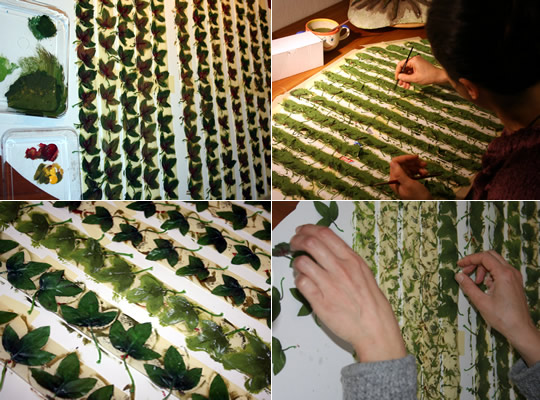
When the glue was dried I covered a piece of cartoon with masking tape sticky side up and presses leaves onto the tape. (Again thanks Shelley 🙂 http://notesfromhalfland.blogspot.com/search/label/Answer%20Tree ) Painted back sides first and then painted front sides after backs are dried.

Let all dry and take out from the tape. Hey I have a test branch, look:

So, all went well so far. Make hundreds.. total 500:

I had all leaves ready to be glued onto the tree after about 10 days…

.

adding mosses

I did not have the moss sold in craft stores. So, I tried making my own moss out of the yarn like you see in the first picture. I mixed little pieces of yarn with green paint and applied to the tree after putting some glue over the trunk to where I want to add the moss. I will try finding either real moss or buying fake ones later and add to the tree.

.

painting the tree

At this point I really need to mention a great blog site of  Shelley Noble. If you are into stop-motion review http://notesfromhalfland.blogspot.com/ She has some great posts about the whole process which has helped me a lot while working on this tree. Thank you Shelley!!! You can see her answer tree building process here at: http://notesfromhalfland.blogspot.com/search/label/Answer%20Tree

Back to my tree:

I first painted with chocolate brown as a base color. And after this I tried many different mix of colors to get the right color… burnt sienna, white, brown, yellow, green… I painted over and over. Just do not forget to dilute the paint with water after the first base color. So, the second, third,.. colors do not totally cover the chocolate brown color. Paint, let it dry, look and paint again until you are totally satisfied.

.

making the wood texture

First covered whole tree with DECOSA foam glue. Then mixed plaster with regular wood glue and covered the whole tree. At this point do your magic and try to make it as closed as a real tree texture. I am trying to make a beech like tree here which does not have a strong texture. When covering the trunk, I used a piece of wire to make a tree like texture. When it is all completed let it dry..

adding little branches

I made the little branches out of 0.9mm aluminum wire and masking tape. Lets say you need 8 little branches at the end; take 8 wires and separate into 2 and 4 and 8,.. then cover all with masking tape.

I used yarn when adding the little branch to the main tree branch to make it connected nicely without a thickness difference and covered connection points with masking tape..

Glue roots to the base

I carved the base for the roots and glued with a foam glue named DECOSA..