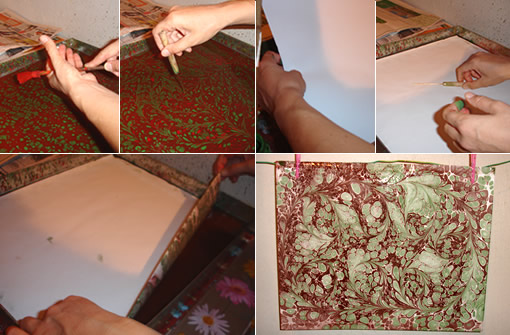
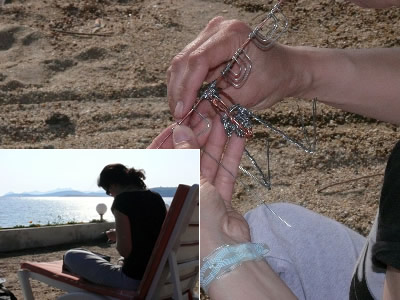
am out of town, travelling. Now, I am in Istanbul with my husband’s family but last week I was in Tokat visiting my mother and sisters. Me and my sister have started working on a new stop motion project. My sister Asuman is a graphic artist and she has been making some great “ebru” over the last year. “Ebru” is an old islamic art. Basically, it is an art form where you first paint over a tray of water and then dip a paper and get the painting. Asuman describes ebru as “the dance of colors over water” Last month, she came up with a great scenario for a stop motion film where she would be using her ebru to make set pieces. So, we have got the ball rolling. Asuman is going to build the set, puppets, .. storyboard and send me. I will be making the animation, shooting. Here is the blog site of this film: http://invasionfilm.blogspot.com I invite you to visit this blog and send us your comments as we proceed.
I also tried making ebru while I was in Tokat. Here are some pics. This was my first ebru and totally novice. I really liked doing it a lot. I wish I had couple more lifes to try all these different art forms. Stay tuned!
By the way, I have redesigned my blog. It now looks totally different. I hope you like the new look!.
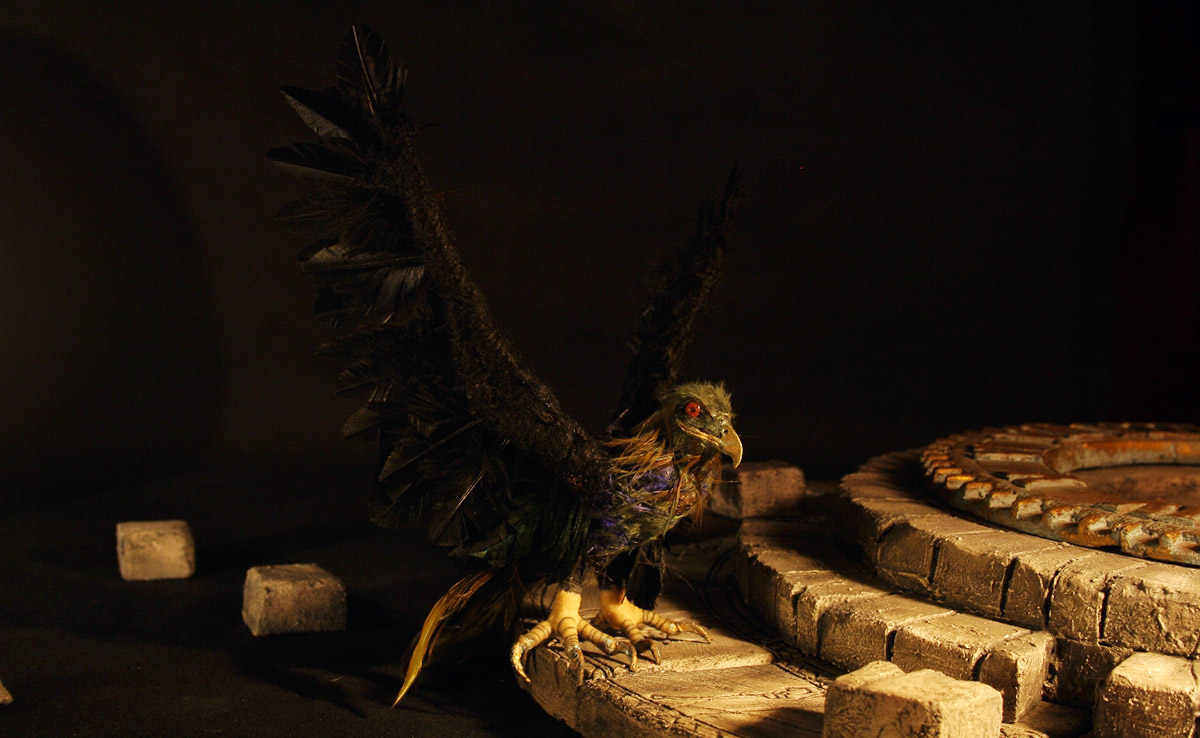
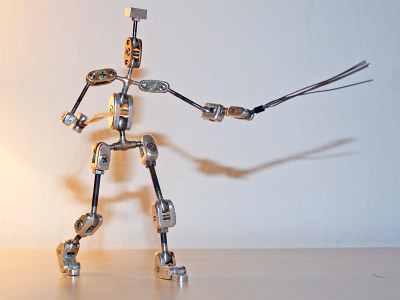
Finally, I am posting about stop motion bird Kush… A lot of things happening here since my last post. I moved my studio to another room in our house, tried making a rig for Kush, purchased AnimatorHD Personal and tried Lumix. This post is going to be long enough so, I will post about these later. SO, here she is; Kush… you can click to enlarge:
And a quick flying test done with Canon 350D without live view and a spycam.
Here is the process:
Adding Rig Points and Final Tweaking of the Armature for Stop Motion Bird
I first revised legs and the tail. Added 2 rig points to the top on her back and 2 other below the shoulders through her thummy. Later I fixed the detachable wing part with epoxy putty. Because I decided to make the feathers in a different way and it was not possible to have detachable wings.
Click here to view bird armature making process of Kush.
Preparing Stop Motion Bird Kush for Feathers and Making of Claws 1
I glued foam onto the armature using a spray glue then trimmed with a small scissor. Old winter socks became the skin to glue over feathers later. I sewn the fabric with a black thread tightly. Then I wrapped claws with yarn.
Making of Feathers for Stop Motion Bird
For the wings; I used real bird feathers. Cut those into small sizes and then sewn over the yarn covered wing parts. For the torso, I glued colored feathers directly. Colored feathers are from a funcky hair clip of mine. Hey wait… “the master of puppets” came to give me some ideas in the middle of this process. See picture in the bottom center.
Claws of Stop Motion Bird Kush
Fingers seemed too thick to me. I ripped off previously wrapped yarn and replaced with a thinner one. Then operation time… Covered body with aluminum foil and applied liquid latex over yarn covered fingers by a piece of foam. After 2 layers of latex is dried I wrapped black thread to make the stripes over fingers. And applied another layer of latex and left it to dry. (you can also use hairdrier for faster drying.) Thanks to Nick Hilligoss for his tutorials about how to work with liquid latex. If you have not done yet, make sure to check out his pages. I have learned a lot from his tutorials.
Claws… I made claws out of a thin cardboard. Dipped each claw shaped cardboard into black tinted liquid latex (with acrylic paint) and left to dry. Then attached claws to fingers with un-tinted latex. Thanks to The Lone Animator for this great idea.
And my favorite process: patina.. I wanted this bird look very old, ancient… So, I applied blue antique powder paint first and then gold wax metalic finish. I did the same for the nib which you see below.
Head of Stop Motion Bird
I made the head out of super sculpy. Painted with acrylic and covered with feathers. Applied gold with a patina process to the nib. Then fixed the head into its place with a piece of epoxy putty. The head can still move a little allowing turning right and left, bending back anf forth.
***
I cant help to post this picture. We had a lot of fun with my daughter in the dark room while shooting the above test. She came in right before I started shooting and mixed up everything. I had to adjust all again after she left but that was totally fine as I really like to see her around while I work on this film.
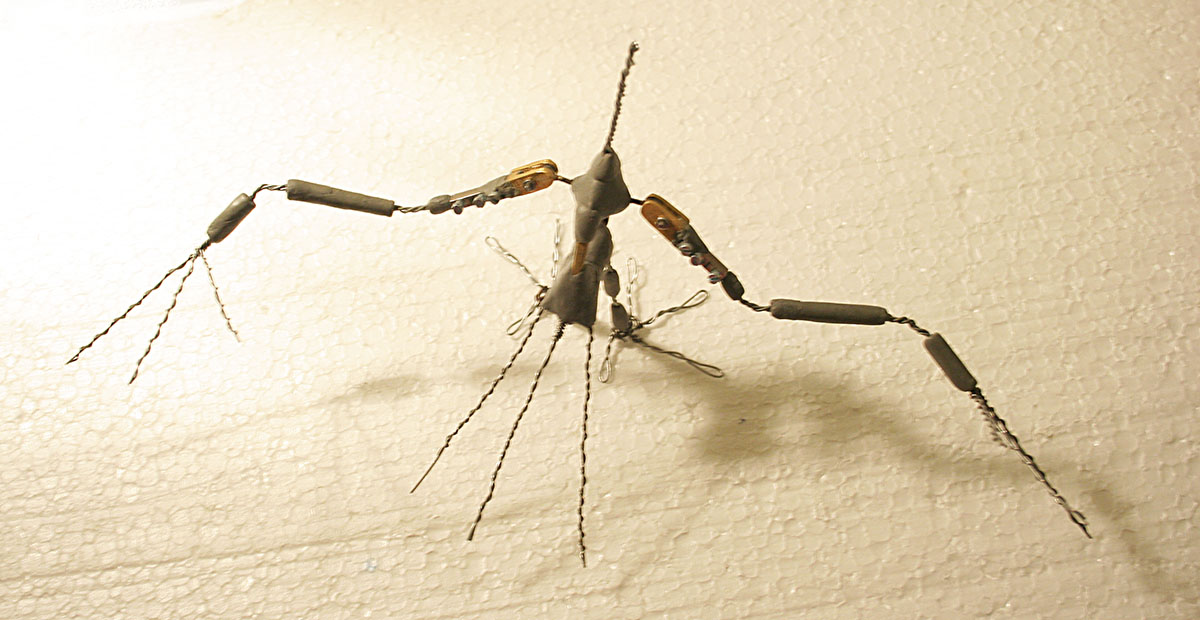
Kush is an eagle like bird living on top of the tree of life… When I first started working on the bird armature, I thought I could go away with a complete wire and epoxy one. But, I want her to fly, land, shake her head,… So, especially her shoulders needed to be strong to stand all different movements of the wings. I ended up starting to make ball joints… You see Kush’s bird armature drawing below:
bird armature drawing
Go to downloads page to view larger size of this drawing. I changed proportions and legs while I was making the armature.
To draw this armature, I spent many hours on the net studying birds. Here are some of the links I find usefull:
Here is a picture of the bird armature from the movie “War Eagles” which was also helpful to me.
Bird Armature from War Eagles
Back to my bird armature drawing… There are 2 ball joints on the shoulders and 2 other on the legs. I cancelled the ones on legs later because the size of the bird is too small to add 2 more ball joints with steel rods. So, my whole ball joint production process was for only 2 and I spent about a month to gather all the materials, some machinery just enough to make something okey and some experience of working with metals. I was planning to work on ball joints for my next film but its good that now I have already some experience on making these.
MAKING BALL JOINTS WITH LIMITED MACHINERY
What I have: A regular power drill (not a drillmill) with cobalt bits
Dremel 300 multi tool
Butane mini-torch (Dremel Versatip)
Vice
I am not going to post a tutorial about making ball joints here as I am not very experienced about these. I listed what I have above, because if you are not able to get professional machinery and equipment and still want to try making ball joints; you can go with something like what I have.
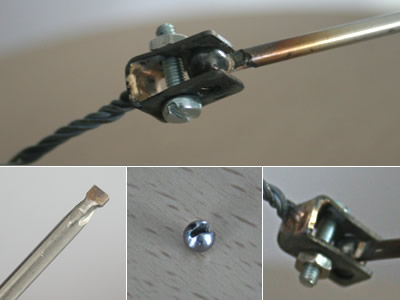
Making ball joints for the bird armature have been the hardest part for me since I started stop motion. I tried cutting different metals with no success. And drilling balls… oh… it was something. After many trips to hardware stores here and in Istanbul, talking to many people working with metals finally I was able to find the kind of brass I could cut with Dremel and drill stainless steel balls with a regular drill. I also found some M3 screws as I needed small ball joints and M4 ones were too big.
Here are some great tutorials you can follow to make ball joints:
Just follow these tutorials and try your best with what you have. Never give up trying and never think that you can not do without professional machineries.
At this point I would like to share with you a trick to drill steell balls. Even if you have the right machinery and tools, it is still hard to drill the balls. Thanks to DADAS here in Bodrum Sanayi who told me this trick to make the steel balls SOFTER.
ATTEMPERING STEEL: MAKING STEEL BALLS SOFTER TO BE ABLE TO DRILL
Get a big metal pot. Fill it with plaster. Put a stone (heat resistant stone for brazing – I have 2 from our fireplace) on top of the pot. Place the steel ball. Get your torch and heat up the ball until it is totally red. Then drop it into the plaster immediately. Make sure it goes down into plaster and do not get any air/oxygen. Wait for some time until the ball is cold. Take it out and you have a softer steel ball !!! Dont worry it is still very hard and you will spend some time and effort to drill it.
If you are having hard time drilling the balls, try this process. It works great!!!
TORSO, LEGS, TAIL AND NECK OF THE BIRD ARMATURE
Above photos are self explanatory. Cut the brass into body shape. Drilled holes for the neck, legs, wings and tail. Used 5 min. epoxy putty to fix up connection points and to make the bones.
WINGS OF THE BIRD ARMATURE
There is a ball joint connected to wire for each wing. I drilled 2 small holes on the back of ball joints to connect wires. Wings need to be fully closed on some of the shots. It is impossible to fully close the wings when there are wires on the joints. So I made each wing 2 parts. You see the white plastic parts above. There are metal parts inside with 2 screws. I used these to make the second part of the wing detachable. So, when I animate, I will close the wings as much as possible then take off the second parts and have only the first parts as a closed wings. This will also allow me to replace a wing if it breaks. I will keep this in mind when covering the wings with feathers.
I will put some rigging points and the bird armature will be ready to go for feathers. The head will be made out of super sculpy and I will use liquid latex to cover legs and fingers. I will post all when I complete..
Long time no post but hard work… I have been trying to figure out making ball&socket armatures. I wanted to post when I HAD something to show.
I first started with a wire armature for Kush but after couple of different wire tests, I decided to try ball joints for the bird armature. Kush will make a lot of things like flying, landing, shaking head, sitting,.. so she need to have a good bird armature. Shoulder joints are the ones who break easily. Now I am working on an bird armature mixed ball joints and wire/epoxy.
Here is my first ball joint. ( I will round the corners of plates around the ball)
Since I started stop motion I have learnt a lot of things but this has the been the hardest one for me. Working with metals is not the problem. Finding the right materials is the hardest thing. I live in a small town not much alternatives here.
Anyways.. Kush’s bird armature will be mixed ball joints and wire with epoxy putty. I will post details later as I am still working on the bird armature.
I have DREMEL 300 to cut metals, Black &Decker drill (not a drill mill..) and DREMEL VersaTip for welding. I use brass plates, steel balls and rods, silver wire for welding. I was not able to drill the balls so instead I cut the ball and placed rod inside for welding as it is shown on the first picture. It is now pretty strong after welding. There are many good articles, tutorials about making ball & socket armatures on the web and I will post URLs later with my tutorial.
And another thing… Hey I now have liquid latex. This might seem funny but I have been tring to find liquid latex for the last 8 months. Last week my sister came here with a bottle of liquid latex she bhought in Istanbul at Armagan Boya in Karakoy. Many thanks to my friend Niyazi who told me about this store and to my sister who went there and picked up a bottle to bring here. She also found some very nice eagle feathers. Very dark and shinny.. Those would look great on Kush.
Here is my first liquid latex covered hand:
As this is a test; two fingers are direct liquid latex over wire and others covered with pantyhose before latex. It works pretty good and I am soooooo happy to have liquid latex.
EDIT on 7th:
Yesterday I posted on stopmotionanimation.com asking for reviews of the bird armature drawing I made. Most of the people replied writing me about the metal thickness of the ball joint I made. They were telling me to use thicker ones. I have limited machinery and I was not sure if I could cut thicker metals. Today, I wanted to give it a try and bhought some thicker brass. And it worked! I can cut and shape thicker brass with Dremel tool. And the result after long dusty process:
This thing is really small.. I could not believe for a while that I did this. 12×8 mm
And another BIG BIG process for me… I was able to drill the ball !!!! (6mm) I applied a special treatment to the ball to make the steal softer and vaowww I was able to drill it. I will post about this unique information an old person gave me here, later with my tutorial post. So, thats all for now. Tomorrow is a big day,.. working on real joints… no more tests..
I have been working on Kush. She is going to be an eagle like bird living on top of the tree of life. She is going to have a wire armature, supersculpy head.
As it is spring here, we went to sea side on saturday. And I had the armature with me.
Hey.. can I fly..
I am a bird can fly.. making an armature in a beautiful spring day by the sea.
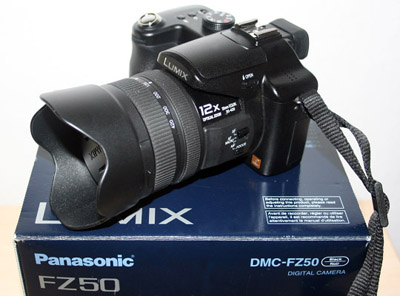
Sunday; a trip to a wonderful place 1,5 hours drive away to our town by car. It was a great chance to take Lumix FZ-50 to shoot all day long trying to get used to camera. I used to use Canon 350D and Lumix’s settings are soo different. I need to spend some more time on it to take better pictures. So, our sunday trip:
Our friends took us to a secret beach. Not so many people knew this place and it did not even had a road to go. We had to go down the hill walking with all of our packs.
Zeynep (my daughter) was very happy with all the climbing and ofcourse swimming, playing. We tried fishing but no success… Mert took his camera and went down under the sea immediately.
I cut the meat and Ismo prepared sticks for cooking. Hmmmmm.. Just sooo delicious on a camp fire.
Climbing back was a little pain after a long day. Zeynep had a lot of fun saying -hey mum there are monsters here in the forest…
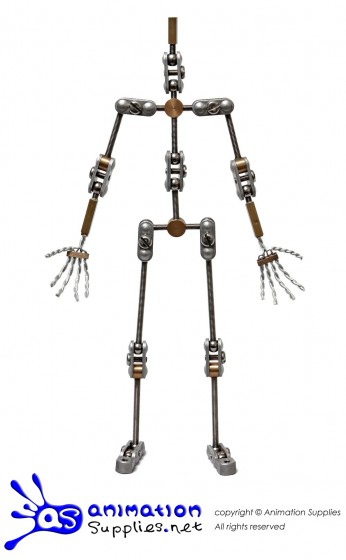
Here he is Adem’s armature. I received this armature couple weeks ago but did not have a chance to post here. It is simply beautiful. Many thanks to Erol Akbarci who made this armature for me. It works great!!! Very clean, carefully produced.
This is 5.5″ You see that he has very long arms. I also had some additional parts; longer leg, arm and body connection parts. So, in the future I will be able to replace the parts to have different armatures with different proportions. He can be 7″ longest.
Here is the drawings I sent him for production. (texts are in Turkish) If you like to download a larger size of this drawing you can go to downloads page. There you will also find another drawing showing the additional parts..
I was out of town for two weeks. One of my relatives had a serious operation. She is doing a lot better now. We were lucky.. we got a very good news after waiting for two weeks.
I am back to town in my studio. Right before we came here, I searched for Lumix on the net and found a good deal. It was a second hand FZ-50 and the owner was living very closed to where we were staying in Istanbul. So, I now have a Panasonic Lumix FZ-50 🙂 In good condition all with its box, manuals, warranties, cables, etc,..
Here are the reasons for me to select Lumix for stopmotion:
– Flicker free
– Live-view that does not overheat
– Able to shoot in 16:9 widescreen HD size
If you like to read more about Lumix you can visit
I have not tried this camera for stopmotion yet. But, I am sure it will perform great! I have been reading its user manual. I will post more when I start using FZ-50 for stopmotion..
It has been a week since my last post. So, I want to post to say that I am alive and have been working on a lot of graphic design and flash animation works. It looks like these projects will take another very busy week and then I will be back working on my film. Even if I am busy with other works, I always have some time to think about my film and follow stop motion blogs and sites on the net everyday. I have also been thinking about new camera & lens options, how to build the set, stop motion software,. etc…
Camera: There is a big chance, I am going to be investing on Canon 40D and Nikon 55mm and 28mm lenses. We have been ( me and my husband ) checking out different places to buy these. Lets see if we can get a good deal for all.. I will post here about why I prefer this setting later. (EDIT on March 16th: I have decided to invest on Panasonic Lumix DMC FZ50 instead of Canon+Nikon set. I will post details later.)
Set: We dont have a basement in our house. So, I need to arrange things here to make a bigger place for the set. I think we will just split the room we work with a curtain to have a separate place for the set. Ohh our baby girl and cat. Need to find a way to keep them away from the set while I am shooting.
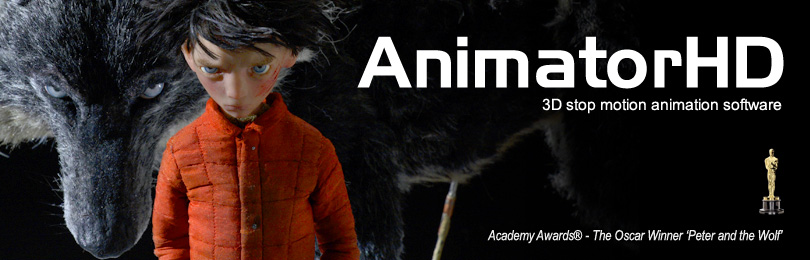
Stop Motion Software: AnimatorHD Personal. I think this is the software I will go with. Again, I will post details later.
I placed an order for a custom ball and socket armature for Adem. It has been an hard decision to make…
For me stop motion is a real art form. I do not expect to make money out of it. This is not my “job” instead this is my “art” that I am learning step by step. So, at first, it did not sound right to me to order an armature. I should have done everything in my hands.
Here you can read how I decided to have someone else make the armature for me.
So, the choices were;
1-using the puppet with wire armature I made,
2-trying to build a ball and socket armature on my own,
3-buying one of those ready-made kits and modifying.
4-ordering a custom ball and socket armature
Let me explain… This is my first stop motion film. So, experimenting everything. Two steps forward, one step backwards.. Learning, learning.. I first started with building a wire armature for Adem. Using wire and epoxy putty for the armature, covering with foam to give a body form and sewing some clothes. Hands made out of silicone and the head made out of super sculpey. Before I finished the final Adem puppet you see under “Attempts”; I tried couple different wire armatures, different wires, epoxy putties,.. different clothing, couple different heads with sculpey.. So, after all, I did some animation tests. Those were okey but not as good as I expected…
I am not after a super cool, “successful” animation here. But, I want to get a little smoother movement on the set. Regarding the smooth movement; I like to leave the feeling of stop motion on the puppets when animated (you know that little interval in between each frame telling the audience that -hey I am being animated here frame by frame and someone here working hard with her heart to make me alive…) But at the same time I don’t want to get a mechanic look. I believe that each puppet has its own spirit and sometimes the spirit needs to be released to be free without considering the restrictions of being inside a puppet. This is how I approach stop motion as an art form.
Back to the stop motion armature… Many pros are out there working with puppets made out of wire armatures. They get great results. It is about experience, knowledge and of course talent! I also have a bird character: kush and I am going to be making a wire armature and animating with that. It is going to be another long process, many attempts… I may try making my own wire, ball and socket mixture armature. but for Adem as a main character of my film; I do not want to ruin my animation because of the problems of wire armature I made.
So, second choice was trying to build a ball and socket armature on my own… Yeah, it could be done if I had the machinery and equipment or I could have tried with some ready made parts. This is whole another process. I imagine how much time I would have spent on trying to build good working ball and socket armature. I will DEFINITELY try for the next project. But not for this one. There are many other things I need to learn. Also, when I try making my own ball and socket armature; I will have a good one in my hand as a reference. (Hey, shhhh.. I have not hold any stop motion armature before. The only one I saw is the one with wire armature I made.)
Why didn’t I prefer buying one of those ready-made armature kits?
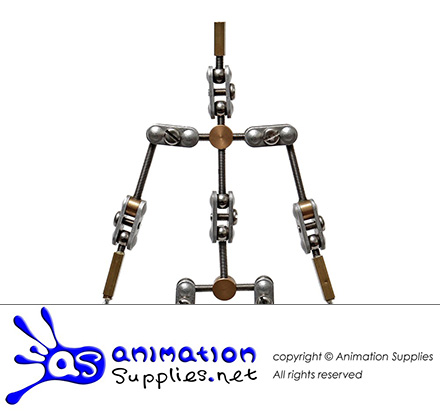
There are many companies selling ball and socket armature kits in many different sizes and quality. Naming couple: Skeletoon, Armaverse, AnimationSupplies. These are the ones seem better among with many others. You buy one from them; modify as much as you can: change proportions, fix joints (change a double ball joint to a one ball joint where it is need such as in the arms..) Price range is $100-$400 depending on the brand, size, type. You can find more expensive ones or even cheaper ones. I have never used one of those. I read many forum posts of the people who purchased these kits on different sites. As far as I have seen the material used and the design may cause some problems. I was not convinced about those kits being worth the money. If you are trying to decide, you can also read the news-byte-commentary about Armature Kits at Stop Motion Works.
I decided to order a custom armature spending some of the money I left for expenses such as buying lights, stopmo software,… Using a good armature will add a lot to the film I will be shooting. So, it is all about your priority.
If you are a newbie, be sure to start with making a wire armature. Then go further with a ball and socket armature, either buy an armature kit, try making your own or purchase a custom armature… This is a suggestion from someone who is new to stop motion but taking it very seriously..