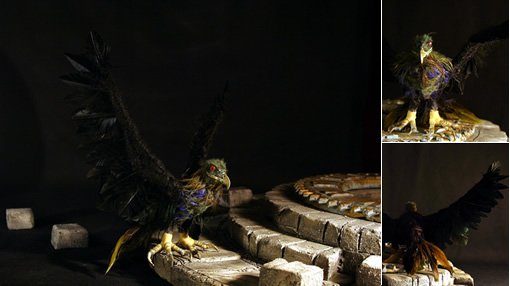
Finally, I am posting about stop motion bird Kush… A lot of things happening here since my last post. I moved my studio to another room in our house, tried making a rig for Kush, purchased AnimatorHD Personal and tried Lumix. This post is going to be long enough so, I will post about these later. SO, here she is; Kush… you can click to enlarge:
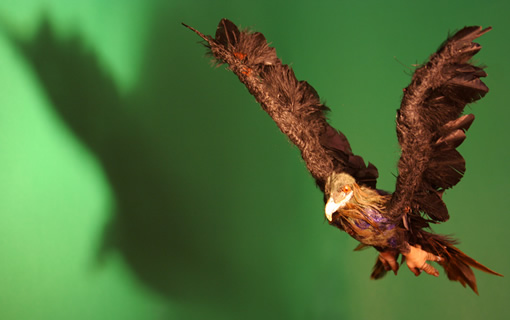
And a quick flying test done with Canon 350D without live view and a spycam.
Here is the process:
Adding Rig Points and Final Tweaking of the Armature for Stop Motion Bird
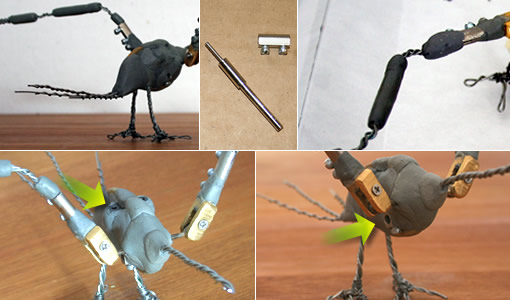
I first revised legs and the tail. Added 2 rig points to the top on her back and 2 other below the shoulders through her thummy. Later I fixed the detachable wing part with epoxy putty. Because I decided to make the feathers in a different way and it was not possible to have detachable wings.
Click here to view bird armature making process of Kush.
Preparing Stop Motion Bird Kush for Feathers and Making of Claws 1
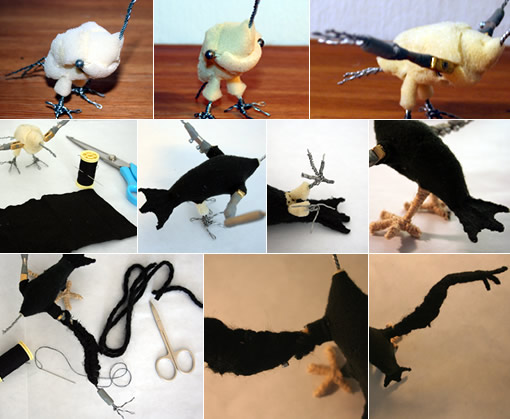
I glued foam onto the armature using a spray glue then trimmed with a small scissor. Old winter socks became the skin to glue over feathers later. I sewn the fabric with a black thread tightly. Then I wrapped claws with yarn.
Making of Feathers for Stop Motion Bird
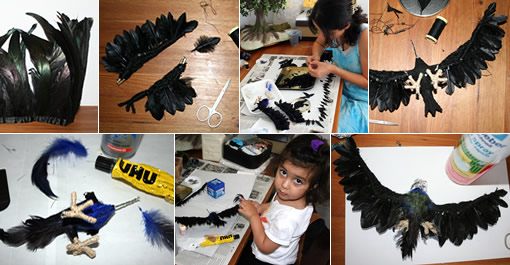
For the wings; I used real bird feathers. Cut those into small sizes and then sewn over the yarn covered wing parts. For the torso, I glued colored feathers directly. Colored feathers are from a funcky hair clip of mine. Hey wait… “the master of puppets” came to give me some ideas in the middle of this process. See picture in the bottom center.
Claws of Stop Motion Bird Kush
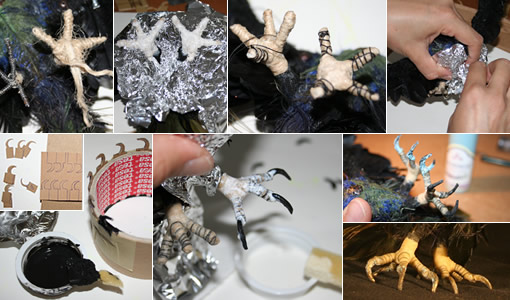
Fingers seemed too thick to me. I ripped off previously wrapped yarn and replaced with a thinner one. Then operation time… Covered body with aluminum foil and applied liquid latex over yarn covered fingers by a piece of foam. After 2 layers of latex is dried I wrapped black thread to make the stripes over fingers. And applied another layer of latex and left it to dry. (you can also use hairdrier for faster drying.) Thanks to Nick Hilligoss for his tutorials about how to work with liquid latex. If you have not done yet, make sure to check out his pages. I have learned a lot from his tutorials.
Claws… I made claws out of a thin cardboard. Dipped each claw shaped cardboard into black tinted liquid latex (with acrylic paint) and left to dry. Then attached claws to fingers with un-tinted latex. Thanks to The Lone Animator for this great idea.
And my favorite process: patina.. I wanted this bird look very old, ancient… So, I applied blue antique powder paint first and then gold wax metalic finish. I did the same for the nib which you see below.
Head of Stop Motion Bird
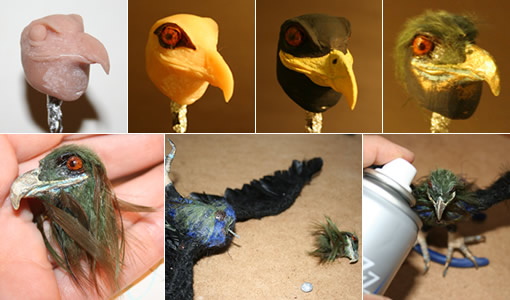
I made the head out of super sculpy. Painted with acrylic and covered with feathers. Applied gold with a patina process to the nib. Then fixed the head into its place with a piece of epoxy putty. The head can still move a little allowing turning right and left, bending back anf forth.
***
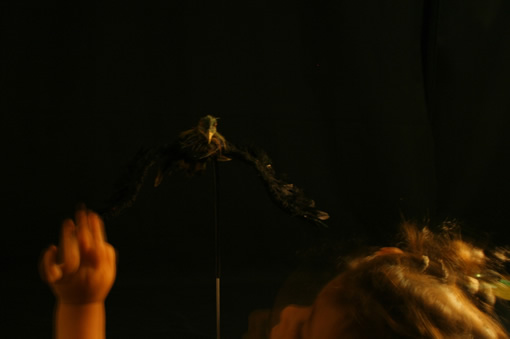
I cant help to post this picture. We had a lot of fun with my daughter in the dark room while shooting the above test. She came in right before I started shooting and mixed up everything. I had to adjust all again after she left but that was totally fine as I really like to see her around while I work on this film.

14 replies on “Stop Motion Bird Kush”
Oh Yaz! Kush is fantastic! I’m going to vopy your methods for my birds! xoxoxo. The claws are especially wonderfully detailed! And the photo of your puppet master’s sweet little hand delicately touching the wing tells me her first film will begin work in only a few years time!
How incredible to have your daughter see your creative work and to naturally become inspired by it. Of course, it was she who inspired you!
All I can say about Kush.. Vaowow!
Shelley, thank you!! Great to hear you like the bird. And yes my daughter.. She likes to take pictures a lot. We gave her a small camera and sometimes we put that on a tripod and she tries to take pictures. It is so funny to see her like that because she and the tripod are the same height. I hope she does some kind of art in the future. Whatever she likes.. just something to feed her soul… maybe stopmotion 🙂 who knows..
WOW!
I am so impressed!!!
you did an amazing puppet job and your animation is excellent! You are a natural all the way.
great post.
jriggity
Justin, it is very important for me to receive a positive feedback from an animation master like you. Thank you 🙂
absolutely incredible work, on the puppet and all of the rest also. You are doing great work on your project. Maybe one day in the future we will work together on a project. Keep up the spirit and enthusiasm.
John!!! Thank you so much. You know this is my first film and the animation above is the first real test. It is great to hear your comments which really encourages me to continue.
I would LOVE to have a chance to work on a project together in the future! It is amazing how internet make us meet while working on this OLD art form. I remember reading about the projects you do with people overseas. It could be great to be involved. Best from the other side of the world!
I still come look at these pics over and over since the 23rd, it really is spectacular work. You said you’re planning to build a dolly too! Very eager to see how that turns out along with Adem. With the live view fix you’ll be shooting with the Lumix from now on I presume? Give us (I really mean me) a snap of your studio space sometime 🙂
All the best,
Tony.
Tony, thank you for your nice words about the process I posted above. Yep, there is a lot to do.. Making a dolly for the camera, getting some lights, making rigs for the puppets.. Oh puppets.. I still need to make Adem. I am going to be travelling for the next 3 weeks but I will post about Lumix, software and my studio while I am away. Also, the big task for me to make storyboards while I am out of town. Hopefully I will finish storyboards in these coming 3 weeks. All the best!
wow is your daughter animating that little clip of the bird flying? if she is shes very talented
Anthony, nope.. She is only 2,5 years old 🙂 But, who knows.. maybe she starts animating in a couple of years. Thanks for the comment!
just popped in for some good ol inspiration from your Kush bird… love Kush. I am in the process of making a few birds for a new gig… this is really helping me. thank you Yaz!! you’re amazing!
Hi Rich, it is great to hear my post about Kush is helping you for your birds. Thanks a lot for your message! I remember you from the amazing puppets you made for Halfland. I am now going to visit your blog.
Hi there just wanted to give you a quick heads up and let you
know a few of the pictures aren’t loading
properly. I’m not sure why but I think its a linking issue.
I’ve tried it in two different web browsers and both show the
same results.
Hi Jeanette, thanks for visiting my blog and your message. I haven’t been updating this website for a long while and there are some problems. Hopefully I will be fixing all soon.