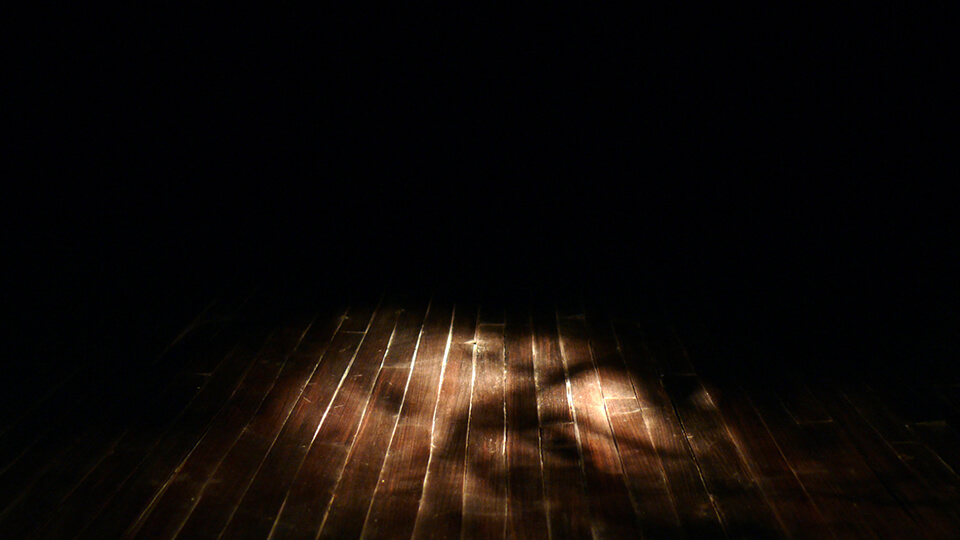
A moving shadow stop motion animation test on the wooden floor set
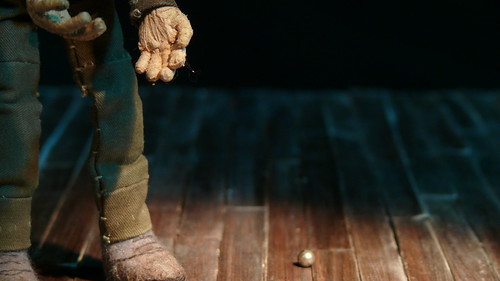
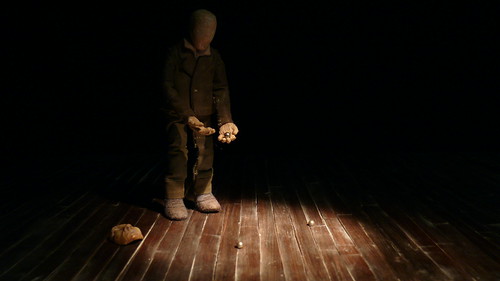
Stop motion animation test of Adem dropping pearls on an old wooden floor
Click here for making of the floor and static tests..
Click here for making of the floor and static tests..
My last post dated 24 Mar, 2011. And today it is 25 Dec, 2014. Loooong time away from my blog…
I have never got to finish Chronos. After my last post dated 2011 here, I kept working on my stop motion film for a while and then eventually I quit totally. Before posting about what I have been doing, I want to publish some posts about my latest work on Chronos here. So, I will have more things documented here and share with who ever is interested about the process.
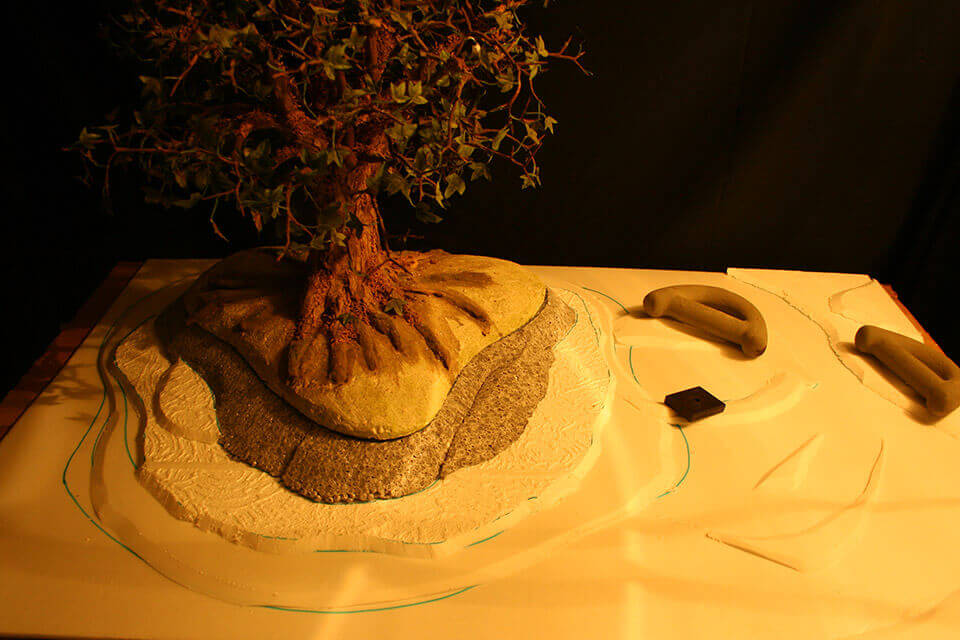
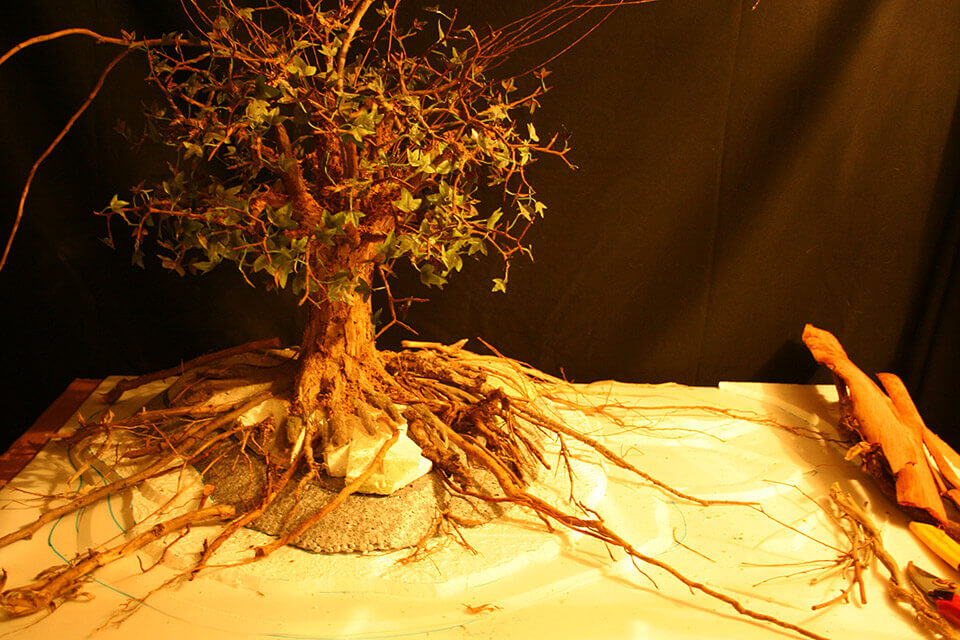
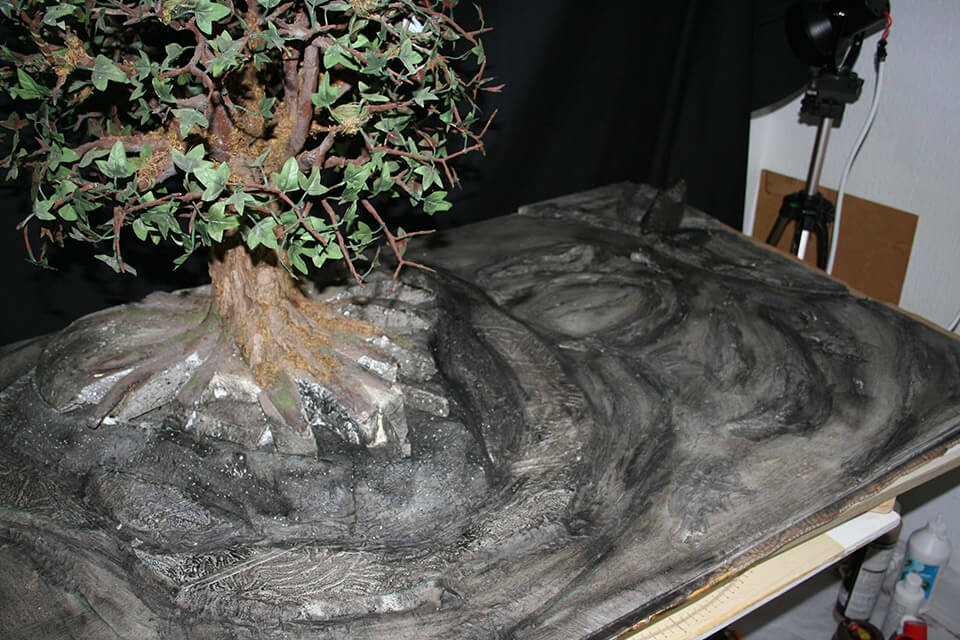
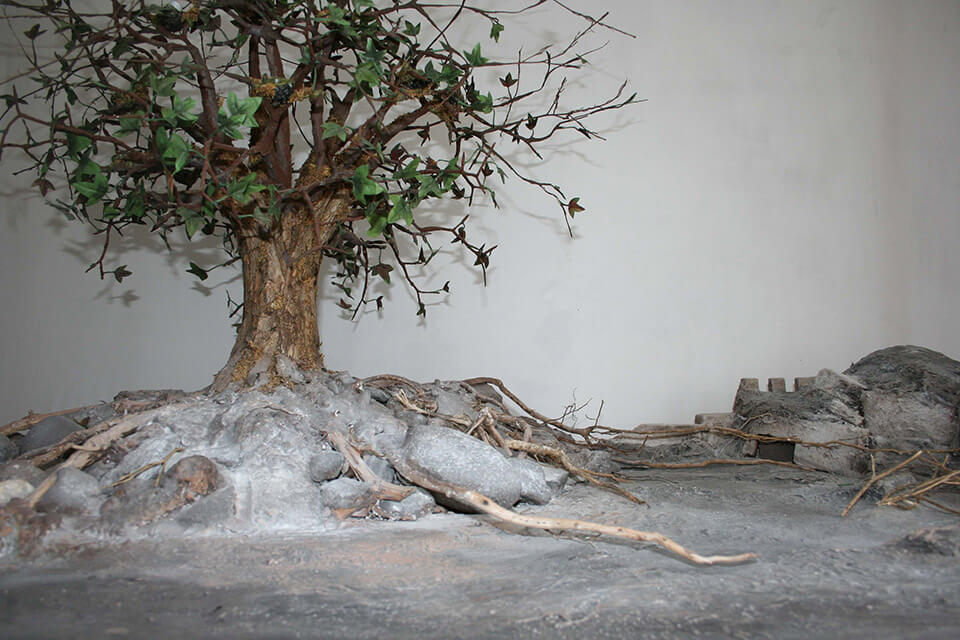
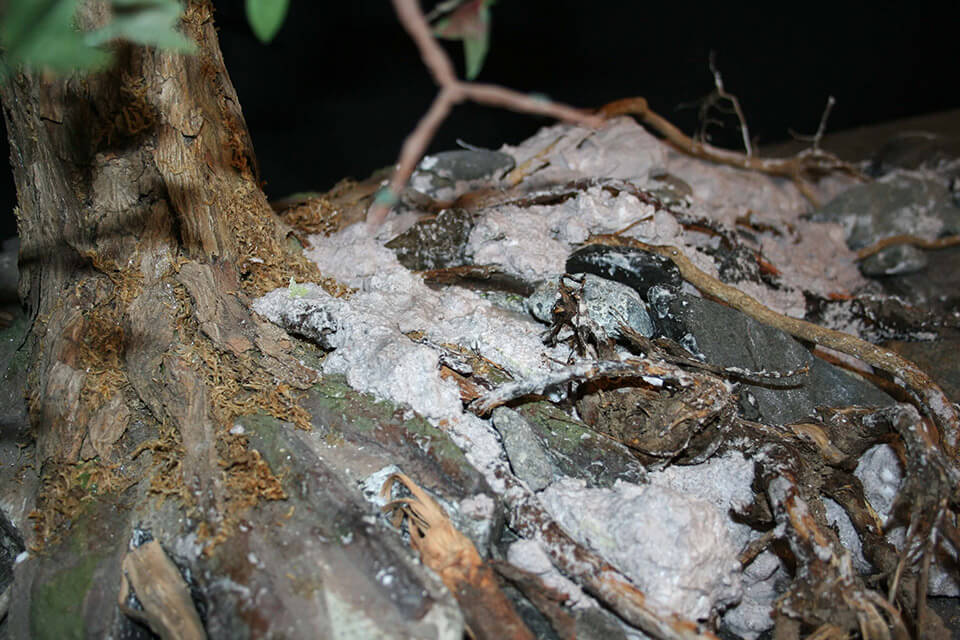
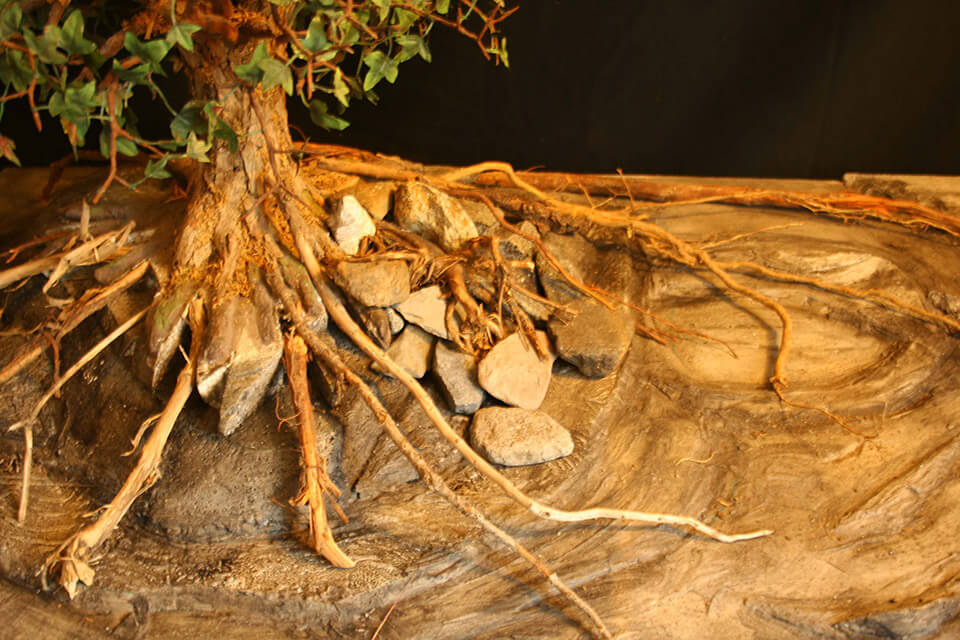
First is about building the set. We moved to a new house 3 times while I was working on Chronos. So, pics are from my latest space in 2012.

The picture above shows how my stop motion set looked like when I finished it:
And some pictures about making of the set for Chronos:

And and… my little cat Zeytin… She passed away on 24 Aug, 2013. I found some pictures of her inside backup folders while I was looking for latest Chronos works. It was very hard to say goodbye to her after spending 15 years together. Hi my little Zeytin:)
 Niyazi Ozyurt is one of the great people I met during my stop motion adventure. He is a professional stopmotinist applying his extensive experince and educational background to create inventive films. His studio is called Maara Animation based in Istanbul Turkey. He and his team created many of both commercial and noncommercial films. They are young and enthusiastic people devoted themselves to create stop motion films.
This is how they describe their approach: “Tracking the footsteps of Hayali* in our culture, Maara creates projects that we write, draw and design. (*Hayali: Shadows play artists are called Hayali. These people create their own imaginary plays, stories and puppets, and animate them.)
They have been working on a 3D-stopmotion TV series. The other day I received an email from him saying that the trailers of T-BOT are on the website. I was totally amazed by the creativity and quality. Everything… models, set design, puppets and animation are all perfect like their other films but this time it is in 3D! If you have 3D glasses handy, try putting those on and watching trailers here: http://www.maara.tv/maara06_eng_video.html Making of photos are also worth to see telling a lot about the process: http://www.maara.tv/maara06_eng_foto.html

Congratulations Niyazi and Maara Team!!! Me and also my little girl Zeynep are your fans here wathcing your wonderful films..
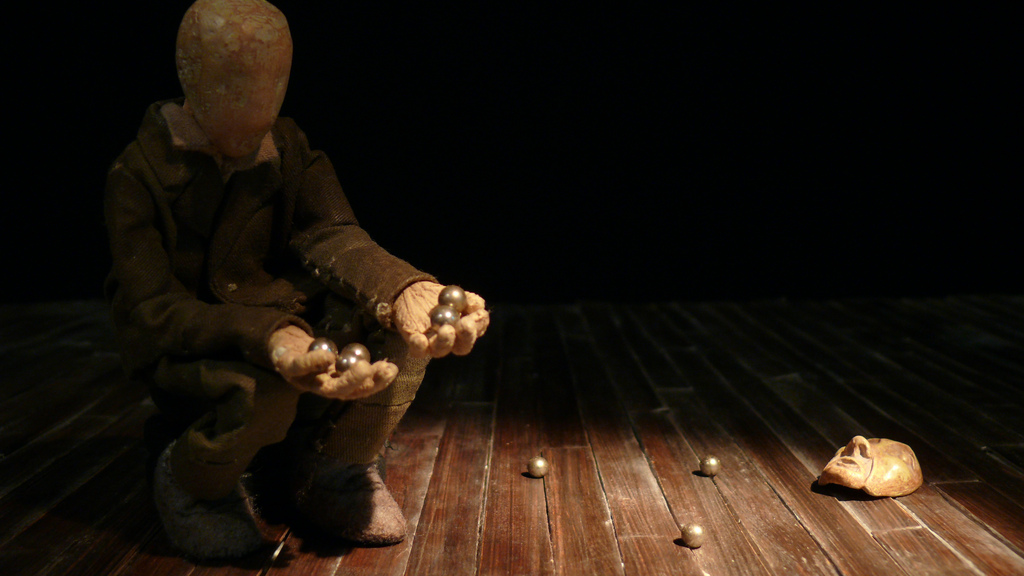
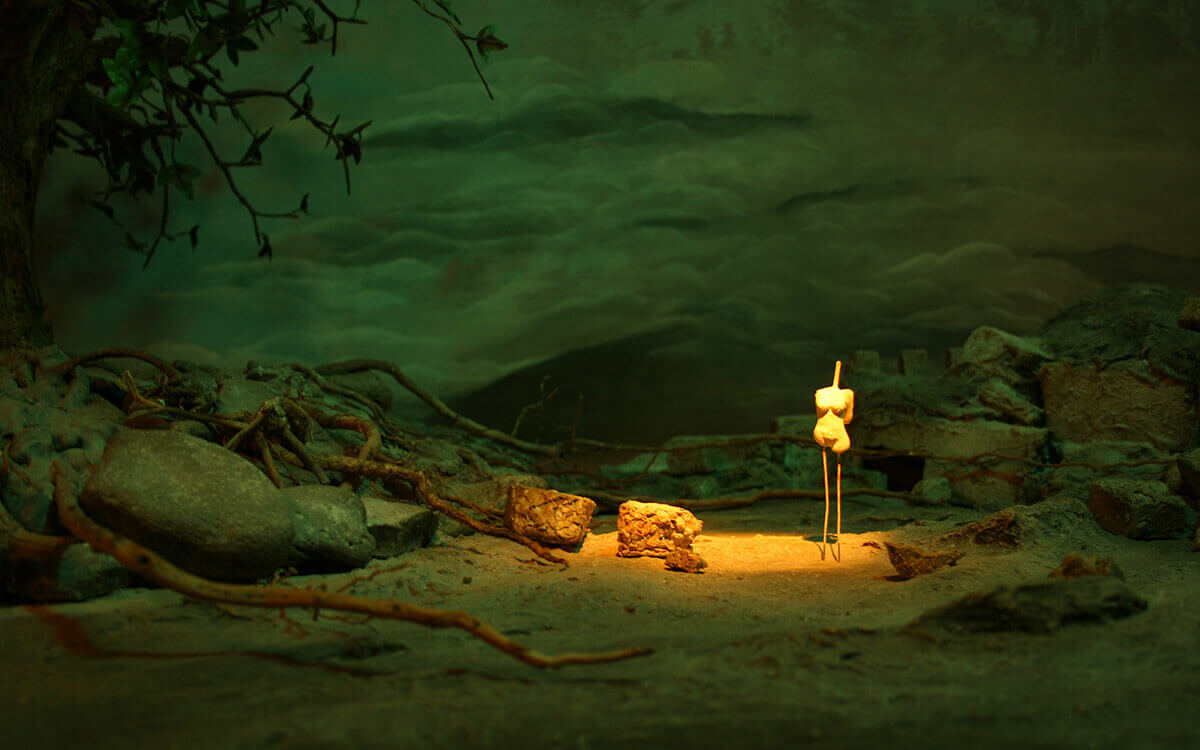
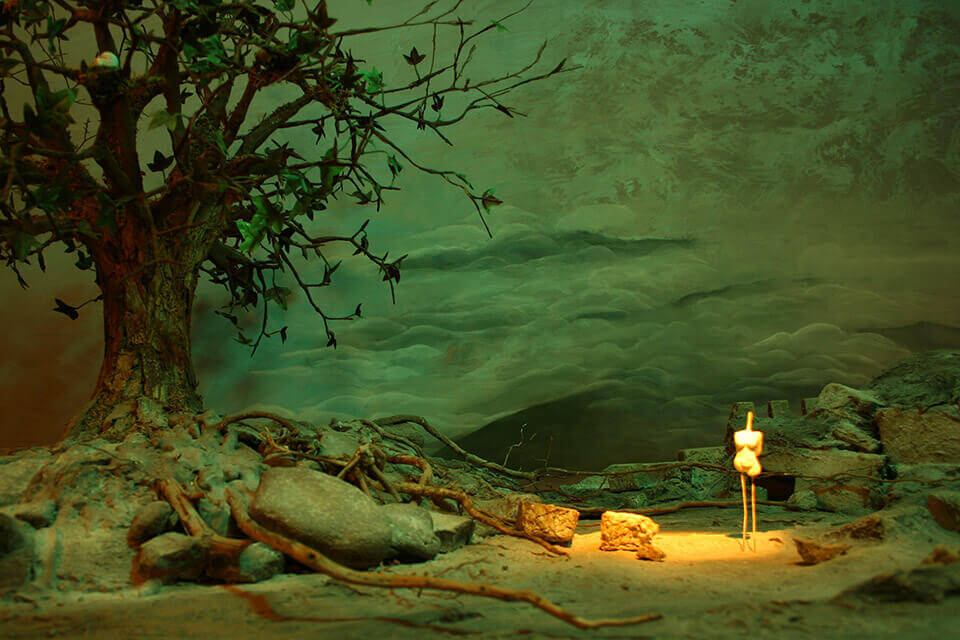
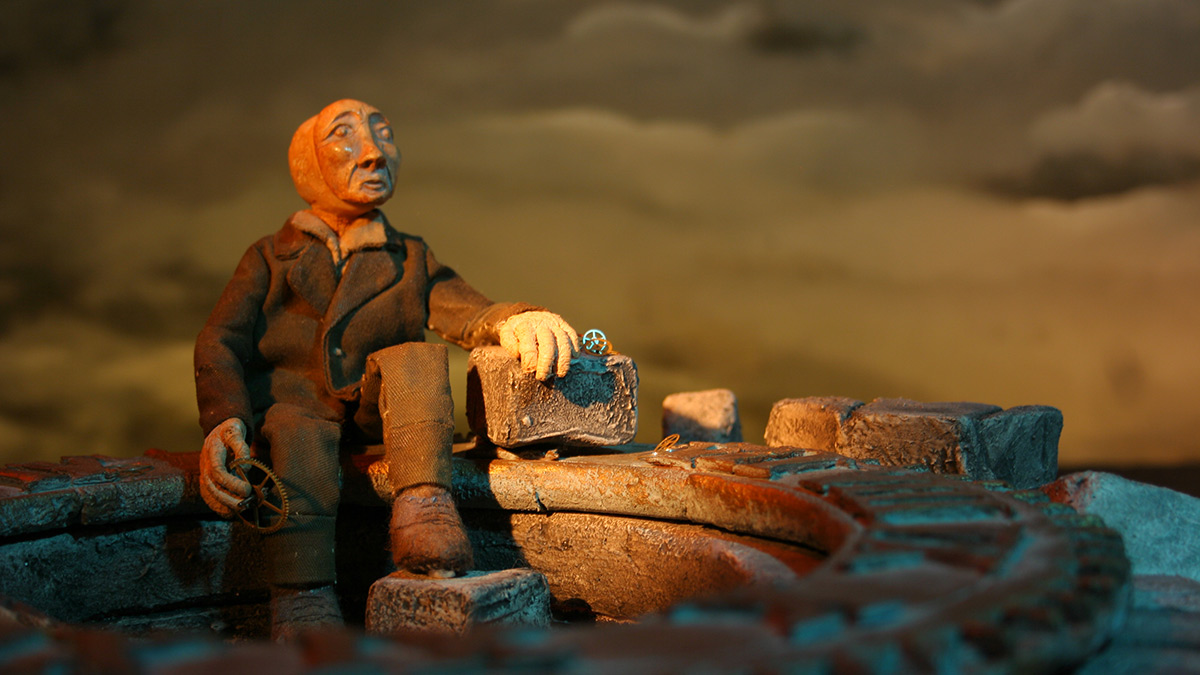
The first scene I will be shooting is Adem dropping pearls on an old wooden floor. I made the floor and did some test shots. What I wanted to have here was a shallow depth of field. Mike has been a huge help on setting up FZ50 and learning about shallow depth of field. Comment section of the previous post here filled with valuable info from him.
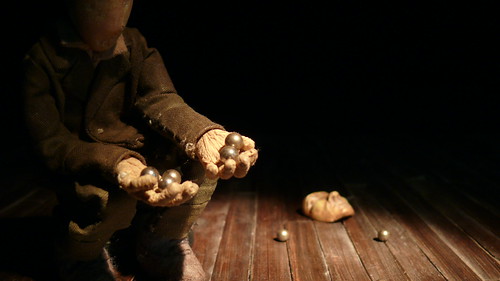
As you see in the above picture I have not been able to get the shallow depth of field. I need to get real closed to puppet like it is here:
I am learning things about both photography and using FZ50. It is probably possible to get the shallow depth of field while puppet as a whole and pearls are visible. But I have not been able to make it. So, I tried another way. Just lit the puppet and pearls (I have not made pearls yet. The ones you see here are some steel balls for armature making) and I was able to make the floor’s back edge invisable. Still not there though. I am not totally happy with the quality of the picture… I might make some walls around the floor as I will be also animating the shadow of tree branches before the dropping occurs. I need somewhere to cast the shadows. Maybe right over the spotlight on the floor… I will see. Testing, testing…
I may change Adem’s hands too. I kind of like these big, rough hands. Have not decided yet.
(the following 2 pictures are added on feb 20th.)
If you click on pictures above you can view on flickr. Both larger versions and exif data is available there. There are also pictures with some other exposure settings.
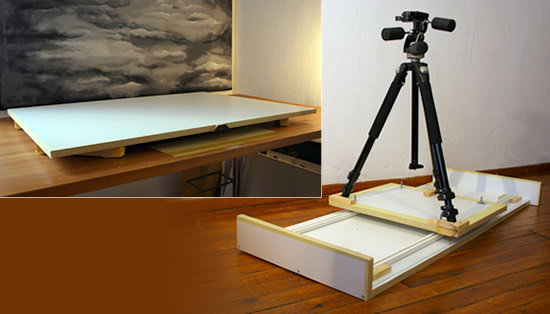
Here you see the floor and making of it:
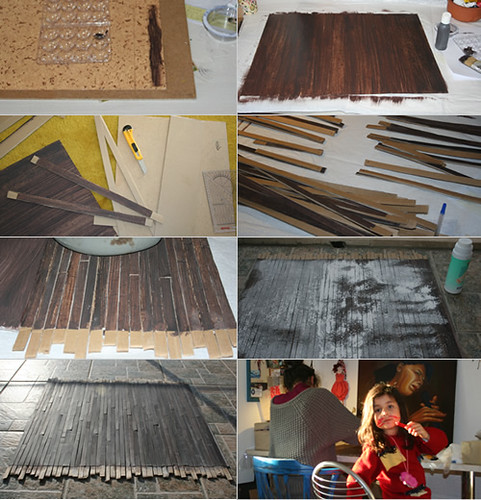
As a base, I used one of those sticky papers; the ones hanged on the wall to stick stuff. It had some texture and design, which I thought might look good for wooden texture. Washed that with burnt sienna. Cut in pieces. Glued together. Applied some talcum powder. Finishing touches with some walnut ink sent by Shelley! Later after talking to Mike, I made this floor bigger to have a little more space for shooting.
Zeynep… she is 4 now. She came to me saying that she wanted to paint wood piece too and then she decided to paint her face..
And some music time… music is a big part of my life. As a computer graphics designer, I spend most of my time either in front of computer or working on the set. There is always something playing here. I will be posting one song a post. The first one here is from Mercan Dede. (Grabbing video from youtube. No video clip to watch. Or dont even take a look at the video…) I wanted this song to be the first one as this is one of the songs tells a lot to me. Name of the song is “Kanatlar Kitabi” means “The Book of Wings” If you like it, try listening in front of the window when it is raining outside…
Another long time with no post and this time I am back… Actually it has been some time since I started working on Chronos again but I wanted to post when I am ready. So, it is about time…
While I was away, we moved to a new house. I did not have a real room to shoot this film so I looked for a rental to make a studio. A cheap place, a barnhouse.. somewhere we can turn into a daytime studio for my film. But, we could not find it. Long story short, I decided to turn a little space here on the roof into a stopmo studio for shooting. This meant Chronos to be a different film. Such a small place for my actual set… It took a while for me to accept this idea. Changing scenario, shooting something else around the same idea… As a “dear friend” said -who has been very suppotive all through the hard times I was going through- maybe my film was born to be something else… Anyways… I have been working on scenario for the last two months. Papers of ideas, different scenarios… As a result there is no real scenario starting from the beginning and ending somewhere. Instead I have some scenes to shoot, to improvise if it is the right word. Actually this fits very well to the life itself. Life we spend in time! Now, there is no big clock. I removed it completely. I will have kush, tree and Adem. Will shoot each seperately and then put together later in the post. No blue screen. Just different scenes coming one after the other. I have some ideas to make it continuous but I will decide when shooting each. I will see how it will turn out. If it does not turn out well; I will be happy because I will leave with such a powerful experience of shooting a stop motion film for many years 🙂 If it turns out well then I and maybe you will enjoy watching couple of minutes of stopmotion film. Both worth trying huh?
So, in this house now I have a space to make props, set, etc.. in the room where we do our web design work and I have a studio in the upstairs for shooting. The other day, while I was trying to setup lights I thought about the places I tried over the last 3 years. In the last 3 years, we moved 3 times. I started this film in a house and then we moved. In that second house, I moved all of my stuff in between different rooms 3 times. And we moved to another house -third one- last summer. This time, while I was settling down with all my stuff I felt really tired.. At the beginning of this film adventure I did not have many things like paints, lights, small and big things.. you know. But, over the time I collected a lot. Now I have many boxes filled with all different kinds of things. Now all settled down, ready to move forward. Ok, enough about my excuses…
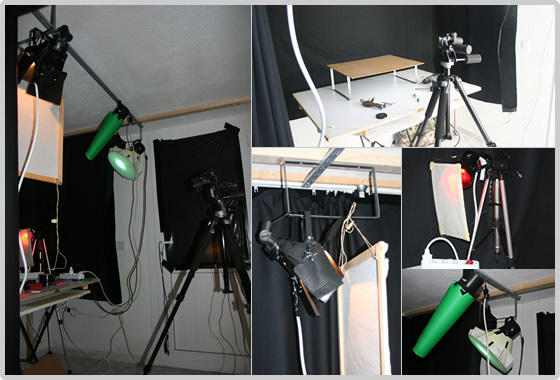
Here are some pics of my new studio in the upstairs. There is not any nail on the walls here. To prevent humidity, we need to be careful about putting nails on the walls here. Wood pieces supported with other wood sticks making something like a cage. And lights, curtains are hanged on the wood sticks. It is such a small place but the best thing is it being totally seperated from the house. A spot just for animating. I am still working on setting up lights; just bought some new stuff to hang lights and fish lines to animate some little things, etc…

I will probably replace that green paper cone with a black one. It serves as a spot light. The barn door light you see in the middle is the one I made out of coke cans (by spray painting coke can metal sheets in black) and a garden light while I was working on The Invasion. My turning table is there as a set table and the farest distance my tripod can go is the place you see in the pictures. Not much room to get a real depth. But any problem can be solved huh?… I have a very flexible story to shoot so I can change things anytime I have a problem just like the first scene with a floor turning into a room with walls around. My next post is going to be about this soon.
While I was away I also finished working on The Invasion. Montage was finished and I sent all to my sister for her to do final touches and make the sound. I did not update that film’s blog either. Will post some pics of shooting and part of animation there too.
 Two weeks ago there was a really serious flood here where we live. We were out of city for couple of days and it happened. Water was 2 meters high from the ground couple minutes away from our house. It was about 30 cm high here. Nothing happened to our house but many people lost their houses, offices, restaurants,.. I am so sorry for those people who are trying to recover… (Picture on the left is from the news on the net) The strange thing is the flood was very bad around the area I looked for the studio. If had found a place and turned it into a studio for my film and set everything there I would have lost all. My set, camera, lights, puppets.. were going to be all under the water. So, how would you call this? Fate maybe, maybe not… Again I am so sorry for all those people and I am grateful for not being able to rent a place in the fall past.
Edit: Adding this pictures to show the dept of field problem ( or shallow dept of field problem..) to Mike.

It has been months since my last post. Time.. huh.. Months, days, hours, years. What do they all mean? Here is my film on a computer screen as blog posts. And all the things I made, Kush, Adem, tree, clock, set pieces.. are inside boxes waiting for the day to become alive again. “Waiting”: what a word to describe the meaning of time, the power of time! Waiting happens when there are “other things” take their course in time. We; me, kush and Adem are all “waiting” for the other things to leave me some time again for Chronos.
Not so much left… In a month or two I will be back here. When I was away I shot The Invasion. I will montage frames, finish that film first and then go back to Chronos. My sister has been waiting for me to finish Invasion for months too…
I love seeing Kush flying. I think I want to see her here until my next! post.
There are two additions to my stopmotion studio. A camera dolly and a turntable, both hand-driven and hand-made. I am going to start shooting the other film I am making with my sister soon. So, I needed these equipment now.
I will have 2 set tables for Chronos. One is going to be the main set table with tree, clock, etc.. And the other will be this turntable where I will shoot Adem away from “time” It will be a lot of fun shooting scenes over this turntable. I did a test shot yesterday for The Invasion and it works like a charm. Here how it looks:

First of all I do not know if this thing is called as turntable in english. It is a set table which I can turn gradually. Anyways, turntable is in 71×104 cm dimentions. There was a rotary breakfast tray in our house we bought many years ago. We have never used that strange thing for breakfast. Things like turning a tray instead of saying -hey can you please hand me the olive- always seemed silly to me. Anyways this thing was in my studio for a long time helping a lot while painting props etc and finally it has found its real place. I mounted this thing to the hardboard piece and then mounted all to my set table. A needle pointer in front and a ruler over the table. That was it!

We (Hakan, me, Zeynep and Zeytin) assembled 2 curtain rods to an hardboard in 112×47 cm dimentions. Another 38×50 cm board goes on top of curtain rods for tripod table. We placed 2 nut washers and 2 nuts in between tripod table and curtain rods while keeping the top of the bolts inside rod rails. Another nut going on top of tripod table finished the installation. We adjusted the top of bolts to not to touch rail base. So, the tripod table can easily be moved by hand. Gradual movement is achived by a paper ruler I glued over the base board and a needle pointer on tripod table. There are small wood blocks mounted over tripod table to keep the tripod in place.
Before making this camera dolly I knew that there were other stop motionists using some wonderful camera dollies. These all gave me a lot of ideas about how to build a camera dolly. I wanted to make something very simple, hand-driven. If you like to check out some other ideas here are some URLs:
– Darkstrider’s camera equipment page
– Nick Hilligoss’s motor driven camera dolly

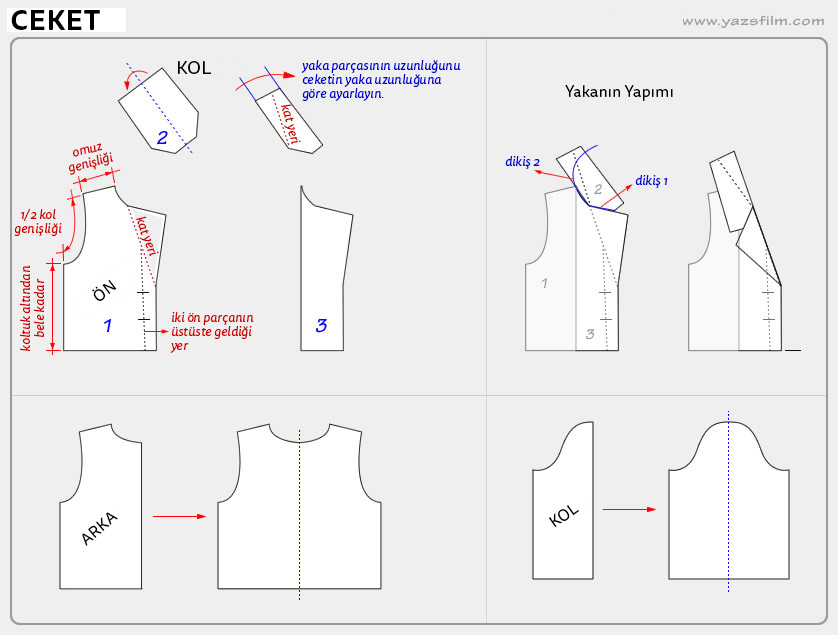
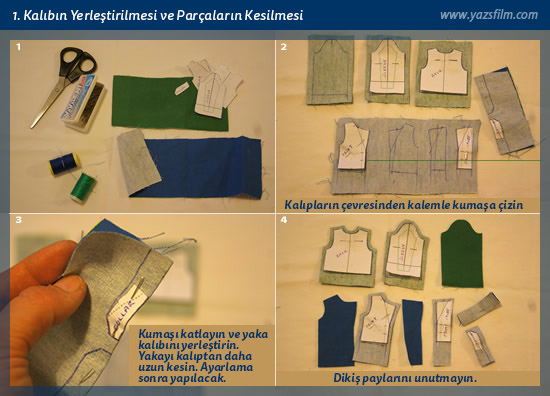
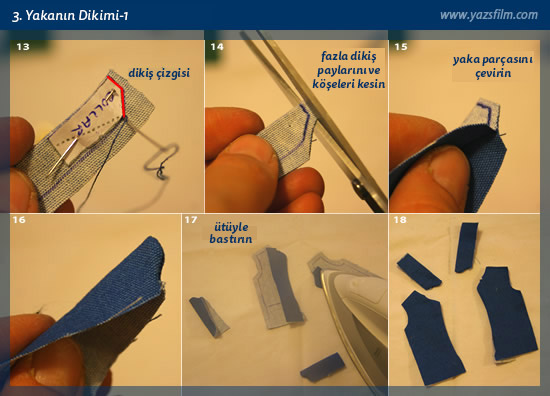
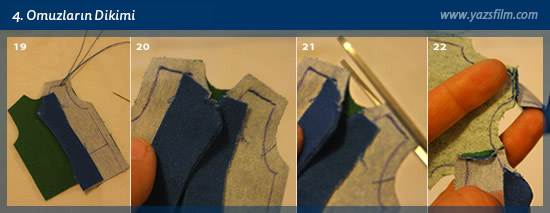
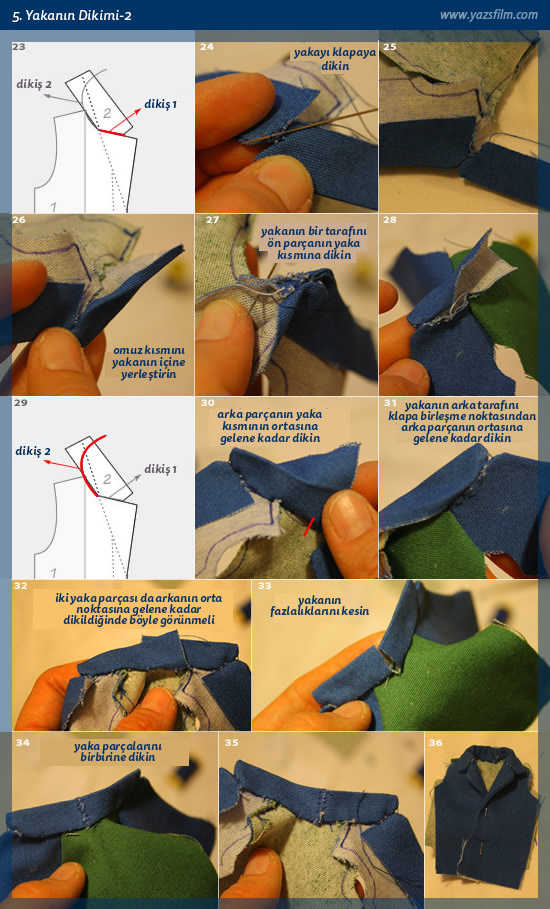
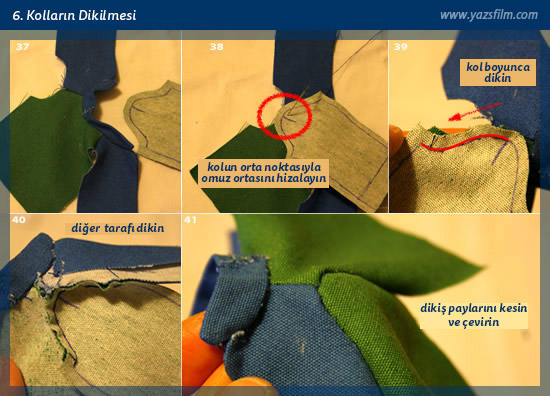
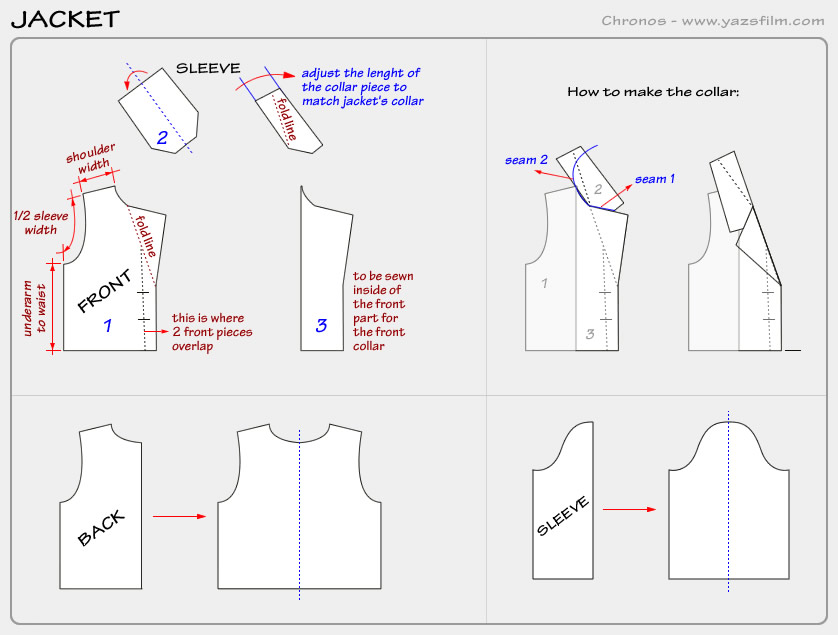
Adem ve ceketi ile ilgili yazımı yayınladıktan sonra bir arkadaşım kukla için nasıl ceket dikebileceği konusunda yardım istedi. Aşağıda ceket dikimi konusunda hiçbir fikri olmayanlara da yardımcı olacağını düşündüğüm şekilde detaylı olarak hazırladığım fotoğraflı ceket dikimi var.

Önce ilk resimdeki kalıbı yazıcıdan çıkarın. Parçaları kesin, kuklanız üzerinde prova yaparak gerekli ayarlamaları yapın. Daha büyük, küçük, kollar daha kısa, boyu uzun, vs… Buradaki kalıp ölçüsü 16cm boyundaki Adem’e göre. Size kendi kuklanız için önce yaka hariç kağıttan bir deneme ceketi yapmanızı ve ölçüleri ayarlamanızı öneririm. Daha sonra kumaşla kesim dikime başlayabilirsiniz.
Resimler açıklayıcı, tıklayarak büyütün.


http://www.puppetpub.com/costumes.html
Bu linkte PDF olarak indirebileceğiniz kukla kostüm kitabı mevcut. (puppet costuming book)
http://www.picturetrail.com/sfx/album/view/60051
Nick Hilligoss’un kukla kıyafet kalıpları ve anlatımı. Sayfanın alt kısmında.
http://www.leenas.com/English/sew_men.html
Çok detaylı dikiş eğitimi.
http://www.cochenille.com/garm.html
Garment Designer programını bedava olarak indirebilirsiniz.

After posting pictures of Adem and his jacket, a friend wanted me to give him some instructions about how to sew a jacket. So, I have prepared a tutorial for people who does not have any idea about sewing jacket and want to make a basic one like this.
First print out the pattern, cut pieces and modify paper patterns by putting it on your puppet, measuring different parts such as arms, neck, etc.. The patterns of sewing jacket you download here is in the size of Adem. I suggest you to make a basic paper jacket (without the collar part) and put on your puppet to make sure the correct size.
Pictures below self explanatory. You can click any step to enlarge.
[ezcol_1quarter]
[/ezcol_1quarter][ezcol_1quarter] [/ezcol_1quarter] [ezcol_1quarter]
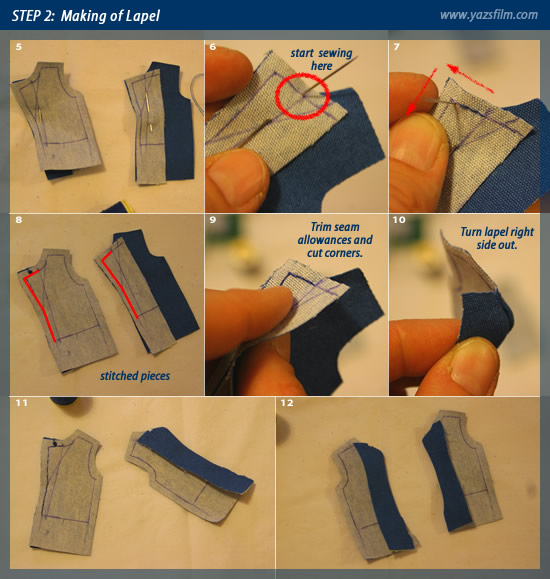 [/ezcol_1quarter] [ezcol_1quarter_end]
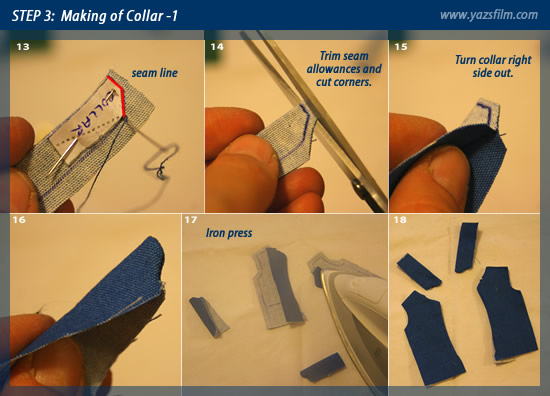 [/ezcol_1quarter_end]
[ezcol_1quarter]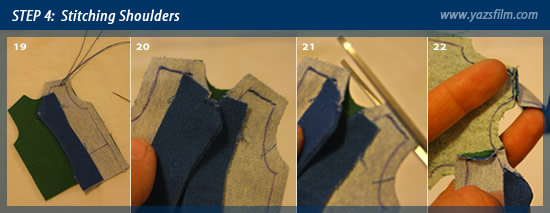 [/ezcol_1quarter] [ezcol_1quarter]
 [/ezcol_1quarter] [ezcol_1quarter]
 [/ezcol_1quarter] [ezcol_1quarter_end]
 [/ezcol_1quarter_end]
http://www.puppetpub.com/costumes.html
There is a wonderful puppet costuming book here which can help you dress up your puppets. You can download the entire costuming book in pdf. I recommend you to download right away and save it to your hard drive. There are not fancy costumes described. But there is basic information about everything you would need for making costumes of a stop motion puppet.
http://www.picturetrail.com/sfx/album/view/60051
Nick Hilligoss’s puppet clothing patterns and tutorial. Scroll down the page to see puppet clothing thumbnail on the left side.
http://www.leenas.com/English/sew_men.html
Very detailed sewing tutorial.
http://www.cochenille.com/garm.html
You can download the demo of Garment Designer for free here. You can experiment different patterns here to get an idea about how to prepare patterns..
Finally, I am posting about how I made Adem. Although I have posted other things separately, this post is going to be a very long one.
Other pictures I posted previously are located here. And a walk cycle test is here to post everything all together about Adem.
I had a ball&socket armature made for this guy last year. I do not have much space for the set so, I wanted to make Adem as small as possible. But, as I was working on the puppet, I was not able to make him look like the way I wanted. I am glad I also ordered some additional parts in the first place. So, eventually I replaced his legs with the longer ones. You may notice in the following pictures; first he is short and then he gets taller as seen with the additions to his pants. Actually, making of Adem was such a long process because I tried many different things for everything of him like the way I cover the armature, clothing, head,… I was both trying different designs and also getting used to working with this armature. Ok, let me start:
There was a double ball joint on his neck. This is the way it should be for a proper movement. But, as I was trying to make him short, I saw that he was going to have a very long neck. After couple of tries, I decided to cancel one of the joints on the neck. His head is made out of super sculpey. I covered the part of joint at the top with epoxy putty after cooking some sculpey. Then covered all with sculpey and cooked again. So, there is epoxy putty inside sculpey. It seems totally working fine. They cooked well together in the oven. There is one drawback so far, I can not change the tightness of that joint.
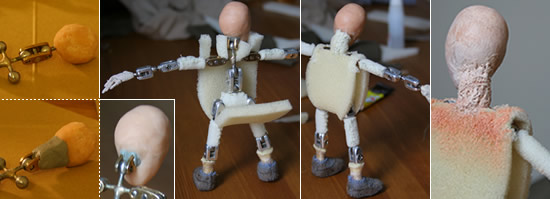
I covered some parts of the body with foam as it is shown on the pictures. I sewn the foam instead of gluing.
And neck.. that was another problem. Because there is a sculpey head, I was not able to use latex for the neck. Sculpey and liquid latex should not touch. I have learnt this recently after having a problem with the hands and claws which I posted about it yesterday. So, I just painted foam with acrylic to make the neck. He now has a short neck and it is looking okey. Also, I was not trying to make a total human like puppet and it was fine making the neck that way for me.
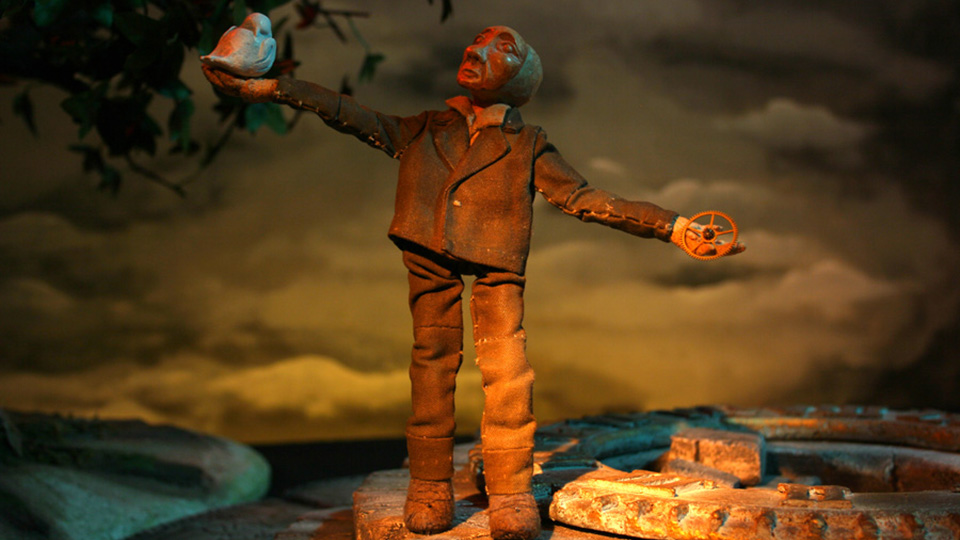
Adem in my film represents human being. Nobody special, no hero,.. So, I wanted to make ordinary things for him.
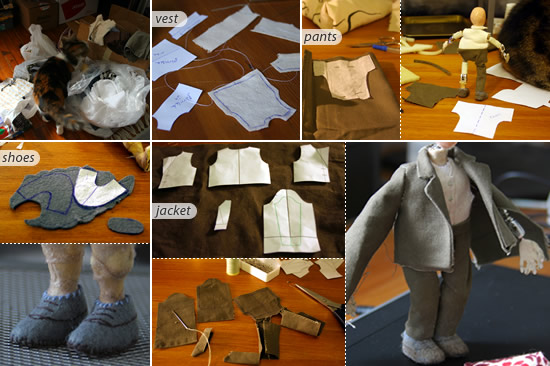
The first pic on the left top shows my cat having fun with a box full of fabric 🙂 Old clothes of ours and friends I collected over the years. The other pictures are self explanatory. when I was a child my mother used to sew clothes for us. She had a sewing machine. It was a lot of fun for me to watch her sew. By helping her out and watching her I learnt to sew some basic stuff. So, that was good for Adem. The vest and pants were easy but making of the jacket was kind of tricky. I googled for some mens jacket patterns. Then I created patterns for Adem’s by combining the ones I found. Just drop me a line in the comments section if you want me to send you patterns. I would be happy to do that.
Although Adem did not like it, I had to weather his clothes to match the atmosphere. No place for brand new things in Chronos. Here is the part I most enjoyed doing:
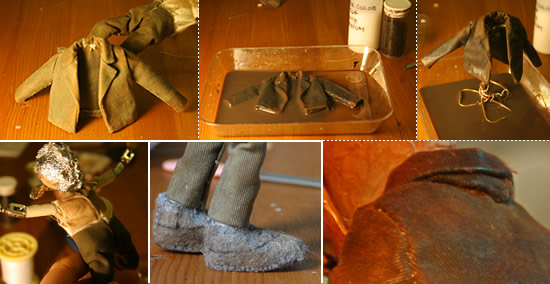
The whole technic and the materials are from Shelley Noble! She sent me so many great materials for my film. Here I used two of those; walnut ink crystals and matte medium as she described in emails.
I first bleached the parts like the collar of the jacket, cuff,… Not much, just enough to give some shading. Mixed well acrylic matte medium, walnut ink cyrstals and a little water in a plate. Dipped the jacket. And then left it hanged overnight. As Shelley said it changes color as it dries. I applied same mixture to his shoes and vest. Just some with a brush and left for drying. I love the effect here. There is a closeup pic to his jacket at the bottom right. Thank you Shelley!!!!
Since I had problem with the hands I previously made, I am not going to post details about making of these hands here. There are temporary hands.
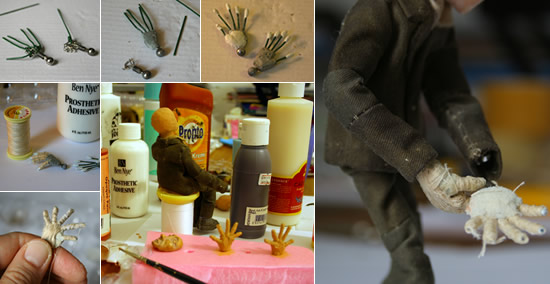
I painted with PAX here. You can find details here in my previous post. Even if this paint works fine (which I think so) I will make the hands again beacuse I am not totally happy with the design. I dont want the hands to be totally realistic but I want little detailed and thinner than these ones.
Adem has a real face like we all have. In the film you will see him both with and without a mask. But, he wants to hide his real face until the film is completed. I wanted him to wear a mask on some parts of the film like every human being does in her/his life. Dont we all have many masks… How many of us have seen our own face?…
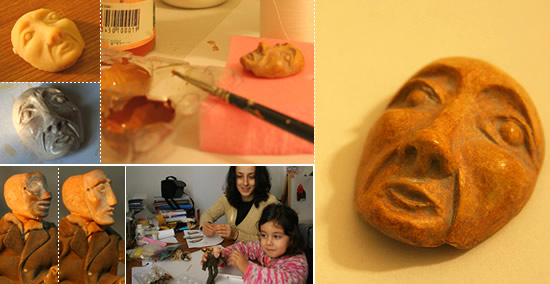
I made 3 different masks and decided to go with this one. Actually this was the first one I created. The other 2 you see on the left bottom were based on real shaman masks. Design of this one was totally came out of my mind. I took a piece of super sculpey and started making. No sketch, no reference pictures… I did not want the mask to have any expression. Not happy, not sad, not angry,.. So, in a way something holding all different expressions of a human face in one mask. Not a man, not a woman.. just a human.
This is how I made the mask: First cooked the sculpey mask and then painted couple times with acrylic. When you paint acrylic directly onto the sculpey with a brush you may get some scratches. To get rid of those scratches after one or two layers of acrylic paint, I applied one coat of acrylic primer and left it to dry. Then couple more acrylic layers. When I was satisfied with the acrylic base I painted with a mixture of acrylic relief paste and wax. This was where I adjusted the color of the mask by adding some brown acrylic to that mixture. I put a lot of talcum powder before it was totally dry. Left it alone for about 15 minutes and then wiped off the talcum powder with a piece of soft cloth. So, there was some powder left around the eyes, mouth,.. giving the mask an old look..